Home install install_master
Master installation
Connecting the master to the battery and to the rest of the EV

You MUST provide a way for the BMS to shut down the charger and all battery loads (including the motor driver), DIRECTLY!

Just because you have a BMS on board, don't think that your pack is protected.
Until you allow the BMS to shut down all battery loads and the charger, your pack IS NOT PROTECTED!

To protect the battery, the BMS must be powered whenever there is any current in or out of the pack.

If there is any current in or out of the pack, yet the BMS is off, your pack IS NOT PROTECTED!

A load that is permanently connected to the battery pack will damage your pack, even if it has a low voltage cutoff. That is because the lowest capacity cell can be overdischarged before the pack voltage is low enough to trip the low voltage cut-off.

Therefore, the BMS MUST be able to shut down all the loads draining the battery; a load with a low-voltage cut-off may be of no help.

Similarly, the BMS MUST be able to shut down all the charging sources (charger and regen); a source with a high-voltage cut-off may be of no help.

For a clean and reliable installation, we recommend that you use ferrules crimped on all control wires screw terminal blocks.
Ferrules are not required; but, if you do use them, you will need to know how to crimp them; here is a paper on proper crimping technique from Molex.

User supplied parts:

  • Connectors to anything other than the BMS
  • Isolated ring terminals for the charging wires, for the gauge of the charging wires, and for #10 studs
  • Main contactor
  • Main fuse
  • Wires for low voltage wiring, various colors (recommended: 20 AWG stranded, 300 V, PVC, -40°C ~ 105°C, UL Style 1007/1569, for example this one)
  • Ferrules for above wire (recommended: 20 AWG, 6 mm length / 11.5 mm total, white)

Proper tools for the installation of this BMS include:

  • Wire cutters for small gauge wire (24 to 18)
  • Wire strippers for small gauge wire (24 to 18)
  • Small flat blade screwdriver (for the screw terminal blocks)
  • Large Philips screwdriver (for the charging current sensor)
  • Small crimper (for the ferrules, if used)
  • Medium sized crimper (for the ring terminals on the charger wires)

Other tools you're likely to need for the EV assembly include:

  • Wire cutters for the battery cables
  • Utility knife (to strip the battery cables)
  • Large crimper (for the terminals on the battery cables)

Here is a recommended schematic diagram for an EV using a Lithiumate Lite BMS.
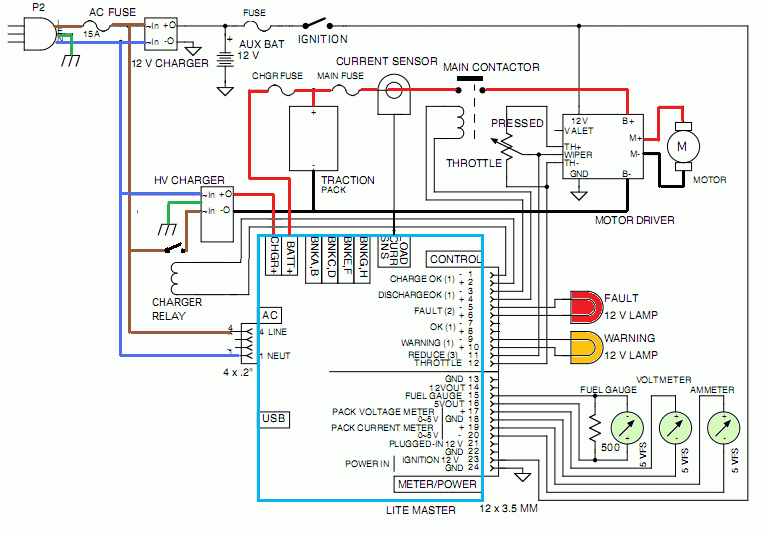
For simplicity, the connections to the cell boards are not shown.

Schematic
Typical EV schematic with a Lithiumate Lite BMS
NOTE: pin-out of 4-wire AC connector is for rev C Master. For rev F Master use pins 3 and 4 instead.

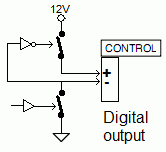
Each digital output of the Lite has 2 switches:

  • One switch between the + output and +12 V
  • One switch between the - output and ground

The switches are turned both closed or both open:

Simplified schematic
Simplified schematic of a digital output.

You can connect a load to the digital outputs in these ways:

  • A1: One lead to the + output and one to the - output
  • A2: One lead to the - output and one to +12 V
  • A3: One lead to the + output and one to ground

Do not do any of the following, as the BMS will not work (no damage to the BMS):

  • B1: Connect a + output to +12 V
  • B2: Connect a load between a + output and +12 V
  • B3: Connect two - outputs together
  • C1: Connect a - output to ground
  • C2: Connect a load between a - output and ground
  • C3: Connect two + outputs together

Do not do any of the following, as the BMS be damaged:
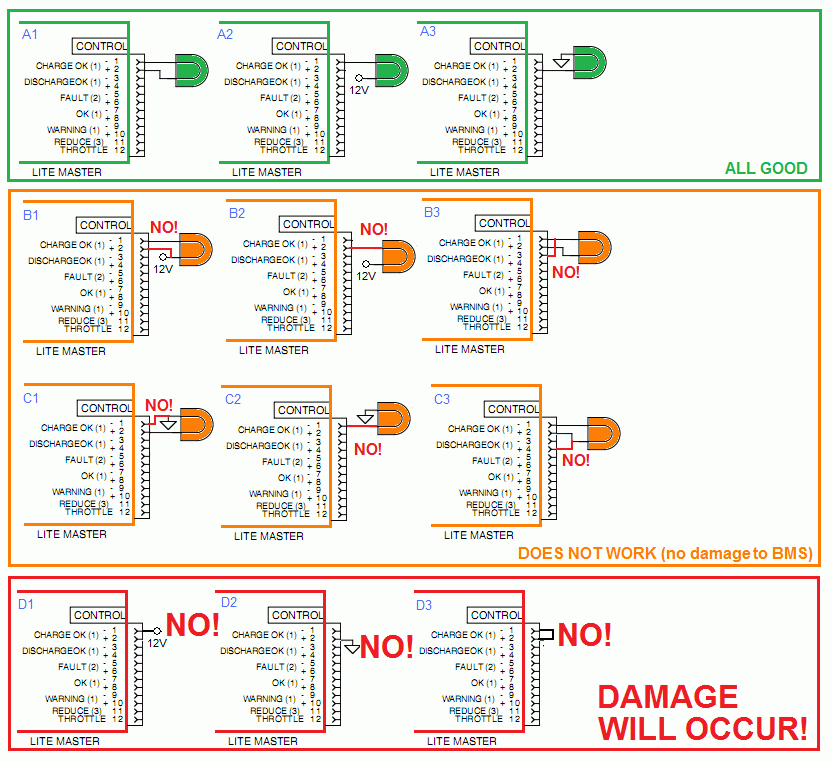
  • D1: Connect a - output to +12 V
  • D2: Connect a + output to ground
  • D3: Connect + and - outputs together
Schematic
Do's and don'ts when wiring the digital outputs.


© 2008~2024 Elithion™, Inc.. All rights reserved. The Elithion brand and the 'ə' (upside down 'e') logo are Trademarks of Elithion Inc.
Page published on: Nov 08 2019.      Installation manual