|
|
Configure
Configure the BMS
|
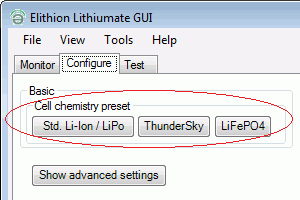
Set the cell chemistry:
- In the Lithiumate Lite GUI application, go to the "Configure" tab
- Press the button for the chemistry of the cells
|
|
|
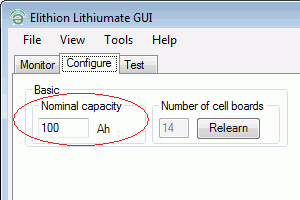
Set the battery capacity:
That is the capacity of each cell, but if cells are connected in parallel, then it's the total capacity of the cells in parallel.
For example:
- If the battery is a single string of 40 Ah cells in series, then the battery capacity is 40 Ah
- If a pair 40 Ah cells are connected directly in parallel, and all the pairs are then connected in series, then the battery capacity is 80 Ah
- If the battery consists of two separate string of 40 Ah cells in series, which are then connected in parallel at the 2 ends, then, sorry, the Lithiumate Lite won't work: use a Lithiumate Pro instead (or, better, rearrange your battery so that it's made up of pairs of cell directly in parallel)
|
|
|
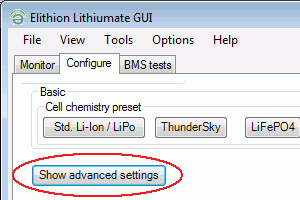
To perform additional configuration:
- Click the "Show advanced settings" button.
- If appropriate, change settings
|
|
|
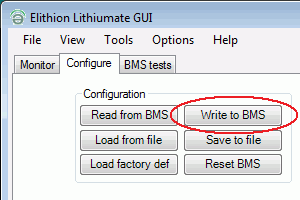
After you make changes in the advanced settings, save them by clicking the "Write to BMS" button.
(Unlike the basic settings, which are written to the BMS immediately.)
|
|
|
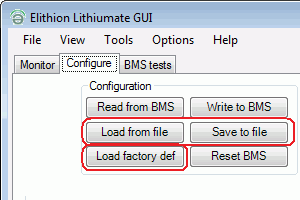
You can make a back up of the settings to your computer's hard drive, or restore settings from the hard drive.
You can always restore the settings to their factory defaults.
All the functions of these configuration buttions are also available through the "File / Configuration" menu.
|
|
The GUI application explains the function of each item: hover over an item to see an explanation of what that item does.
Following are examples of items you may want to update.
|
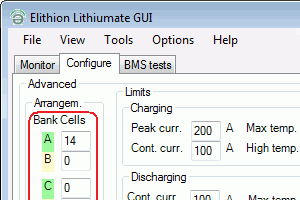
If there is a communication problem with a bank, and the BMS has not discovered it, you can configure the Master to look for that bank and tell it how many cells to expect.
- In the "Arrangement" box, enter the number of cells to be expected in a bank
- When done, don't forget to click the "Write to BMS" button
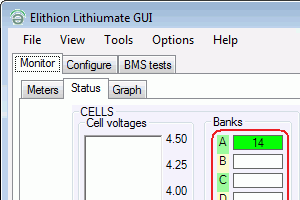
- If you then go to the "Status" tab (part of the "Monitor" tab), you will note that that bank shows a fault, until you fix the communication problem with that bank
|
|
|
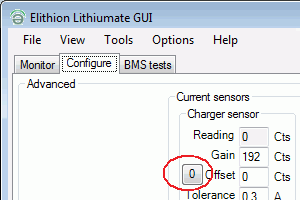
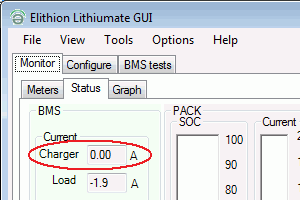
You can calibrate the charger current sensor so that the BMS reports 0 A when that current is 0.
- Make sure there is no charger current (the charger is off or disconnected)
- Click the "0" button next to the "Offset" field, in the "Charger Sensor" box
- The value in the "Offset" field will change to the value that was in the "Reading" box at the time you clicked the button
- When done, don't forget to click the "Write to BMS" button
If you then go to the "Status" tab, you will note that the charger current displayed will be 0 A or so
Similarly, you can calibrate the load current sensor.
|
|
|
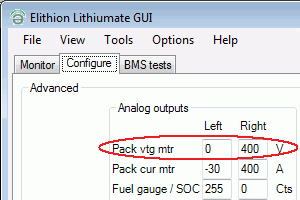
If you have a voltage meter on the dashboard, you can set-up its full scale
- In the "Analog outputs" box, in the left "Pack vtg mtr" box, enter the number that appears on the left end of the dial of the voltmeter
- In the right box, enter the number that appears on the right end of the dial of the voltmeter
- When done, don't forget to click the "Write to BMS" button
- If you then go to the "BMS test" tab, you will force the "Pack vtg" value in the "Analog outputs" box, and see that the voltmeter responds accordingly
|
|
|
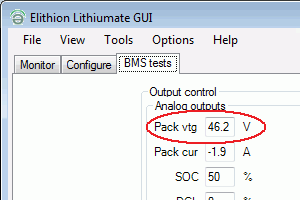
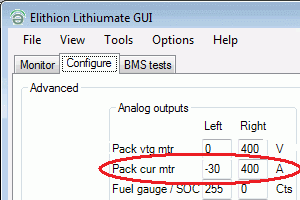
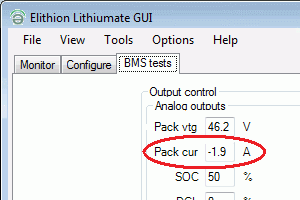
If you have a current meter on the dashboard, you can set-up its full scale
- In the "Analog outputs" box, in the left "Pack cur mtr" box, enter the number that appears on the left end of the dial of the ammeter
- In the right box, enter the number that appears on the right end of the dial of the ammeter
- When done, don't forget to click the "Write to BMS" button
- If you then go to the "BMS test" tab, you will force the "Pack cur" value in the "Analog outputs" box, and see that the ammeter responds accordingly
|
|
|
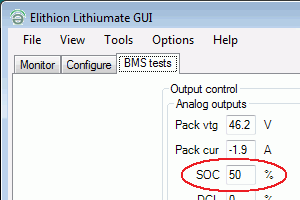
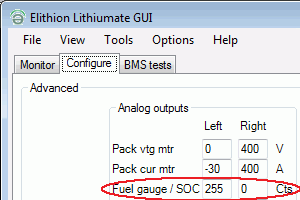
Setting up the fuel gauge to emulate a "sender" to a standard automotive fuel gauge is a bit more complex, as it's done through trial and error (because fuel gauges for ICE car are designed to work with their own sender unit, whose resistance could be any value, and could be 0 at full or at empty).
- Go to the "BMS test" tab, and force the "SOC" value in the "Analog outputs" box (in the "Output control" box) to 0 %
- Go to the "Configure" tab, and play with the value in the left field of the "Fuel gauge / SOC" box (in the "Analog outputs" box), until the fuel gauge is exactly at "E" ("Empty")
- Go back to the "BMS test" tab, and force the "SOC" value to 100 %
- Go back to the "Configure" tab, and play with the value in the right field of the "Fuel gauge / SOC" box, until the fuel gauge is exactly at "F" ("Full")
Note that the left value in the "Fuel gauge / SOC" fields could be either lower or higher than the right value, depending on whether the "sender" that is being replaced happend to have minimum resistance at full or at empty.
|
|
|
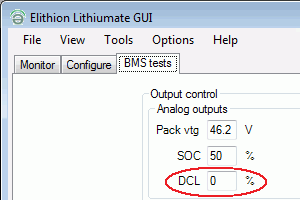
Setting up the throttle reduce settings is a bit more complex, as it's done through trial and error (because the various motor drivers have different parameters for theor throttle inputs).
It's also tricky because you need to make sure that the vehicle won't move even as you press the throttle.
- Go to the "BMS test" tab, and force the "DCL" value in the "Analog outputs" box (in the "Output control" box) to 0 %
- Go to the "Configure" tab, and play with the value in the left field of the "Throttle reduce" box (in the "Analog outputs" box), until the exactly point that pressing the throttle has no effect
- Go back to the "BMS test" tab, and force the "DCL" value to 100 %
- Go back to the "Configure" tab, and play with the value in the right field of the "Throttle reduce" box, until the BMS has no effect on the throttle
|
|
|
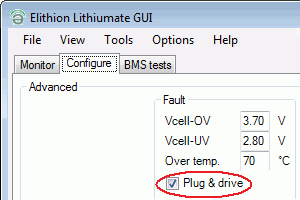
Normally, an EV is not allowed to be plugged into the AC power while the ignition is on, because it indicates that you're about to drive off while th epower cord is still connected.
Therefore, the BMS goes into a fault if that happens.
If, however, you prefer not to see a fault in that case, you can disable it.
- In the "Fault" box, uncheck the "Plug & drive" box
|
|
|
|