Hardware test
Test the installation
Once the BMS is installed, you'll be tempted to take your EV for a spin right away, under a false sense of security because a BMS is present.
Resist the temptation! Test first!
All too often, expensive battery packs were damaged, some beyond repair, because incomplete systems have been operated before testing would reveal problems.
Just because a BMS is present, it doesn't mean it's wired and programmed correctly.
The BMS, by itself, cannot protect the pack.
The rest of the system must obey its command, otherwise there's nothing the BMS can do other than scream, while no one is listening.
Only after you have assured yourself that the entire system is protected, you may operate it normally and unsupervised.
|
To use the Lithiumate Lite application:
- Install the Lithiumate Lite GUI application on your PC running Windows
- Upgrade the BMS software to the latest rev through the Lithiumate Lite GUI application
- Connect the BMS master to the computer using a USB cable
- Wait for the driver to be installed automatically in your computer
- Do not start the application yet: it won't work until it sees a BMS that is powered up
- If you encounter any problems, use the troubleshooting guide
|
|
Test steps:
- Check that the BMS master can be powered by the AC power, and prove that it is able to shut down the charger
- Check that the BMS master can be powered by the ignition, and prove that it is able to shut down the motor driver
- Check that the BMS sees all the cell boards, and the measurements are correct
|
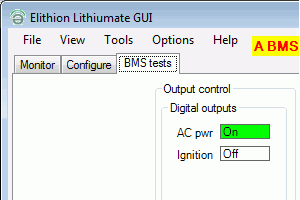
Check that the BMS can be powered by the AC:
- Plug in the EV into the AC power
- Check that the BMS master comes on: the "AC power in" LED comes on
- Check that the "AC power" indicator on the dashboard* indicator is lit
- Launch the Lithiumate Lite application
- Because the BMS has not yet been tested, the application will jump to the "BMS test" tab
- Check that "AC Power" label is lit (green)
|
|
|
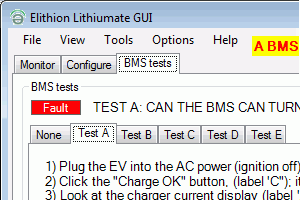
Prove that the BMS can control the charger:
- In the "BMS test" tab of the GUI application, select the "Test A" tab and follow the instructions
- With the EV plugged into the AC power (ignition off)
- Click the "Charge OK" button, (label 'C'); it turns green
- Look at the charger current display (label 'A'), note that there is current (troubleshooting guide)
- Click the "Charge OK" button,(label 'C'); it turns red
- Note that the charger current goes to 0, and that "Test A" passes (turns green) (troubleshooting guide)
- If the current does not go to 0 (the charger is still on) find out why and FIX IT!
- When done, restore control to the BMS: press the "Restore automatic control" button (label 'R')
- After the test passes, unplug the EV from the AC power
|
|
* If installed
|
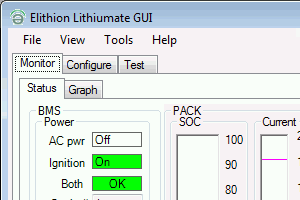
Check that the BMS can be powered by the ignition:
- Turn on the ignition
- Check that the BMS master comes on: the "Ignition" LED comes on
- Check that the "Ignition" indicator on the dashboard* indicator is lit
- Check that "Ignition" button is lit
|
|
|
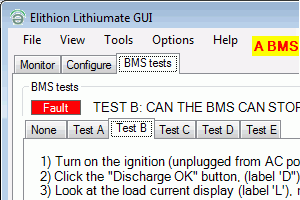
Prove that the BMS can control the load:
- In the "BMS test" tab of the GUI application, select the "Test B" tab and follow the instructions
- With the ignition on (unplugged from AC power)
- Click the "Discharge OK" button, (label 'D'); it turns green
- Look at the load current display (label 'L'), note that there is current (troubleshooting guide)
- Click the "Discharge OK" button,(label 'D'); it turns red
- Note that the load current goes to 0, and that "Test B" passes (turns green) (troubleshooting guide)
- If the current does not go to 0 (the load is still on) find out why and FIX IT!
- When done, restore control to the BMS: press the "Restore automatic control" button (label 'R')
- After the test passes, unplug the EV from the AC power
|
|
|
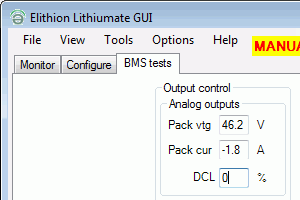
If throttle reduction is implemented, test that the BMS is able to reduce the available torque:
- Connect a voltmeter to the throttle wiper (red probe) and to ground (black probe)
- Turn on the ignition
- Check that the "Warning" indicator on the dashboard* indicator is off
- Note the voltage at the throttle wiper
- Still in the "BMS test" tab
- In the "Outputs control" box / "Analog outputs" box, change the "DCL" from 255 to lower and lower values
- Check that the "Warning" indicator on the dashboard* indicator is on
- Check that the voltage at the throttle wiper decreases (troubleshooting guide)
- Change the "DCL" to 0
- Check that the voltage at the throttle wiper is 0 V
- When done, restore control to the BMS: press the "Restore automatic control" button (label 'R')
|
|
* If installed
|
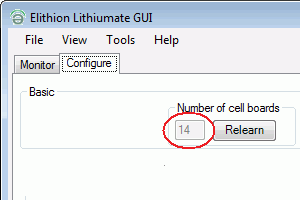
Check that the BMS sees all the cell boards:
- Go to the "Configure" tab
- Check that the BMS sees all the cells (troubleshooting guide)
|
|
|
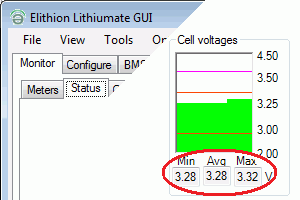
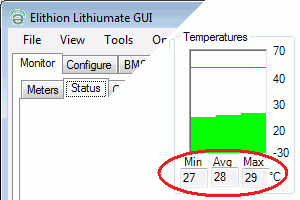
Procedure:
- Go to the "Monitor" tab, and then the "Status" tab
- Check that the range in cell voltages is normal (troubleshooting guide)
- Check that the range in cell board temperatures is normal (troubleshooting guide)
|
|