|
|
General description
Basic concepts in the Lithiumate Lite
See also the detailed functional description page.
|
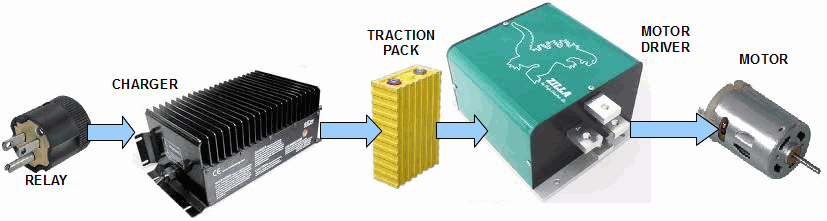
The typical Li-Ion EV traction system consists of:
- A traction pack composed of Li-Ion cells
- A charger
- A motor controller, with a throttle
- A motor
- A BMS to protect and manage the pack, by controlling the charger and the motor controller
The BMS is an integral part of the EV traction pack, and a significant component in the complete EV system.
|
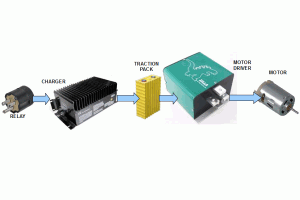

EV block diagram (click to enlarge)
|
|
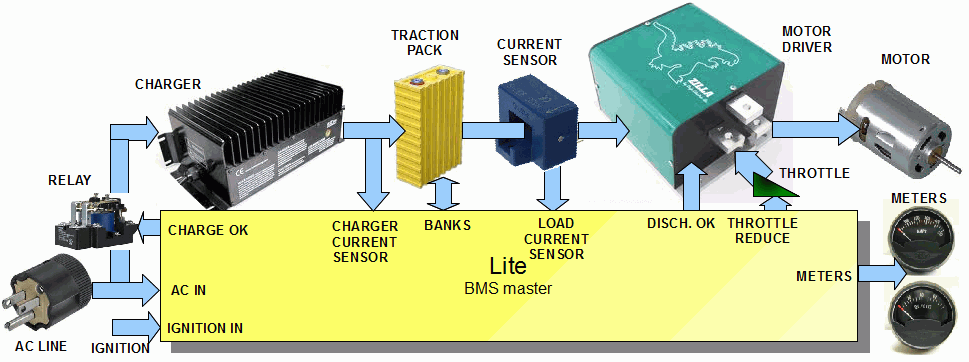
The Lithiumate BMS using a Lite BMS master consists of:
- A BMS master
- The traction pack, divided into banks of cells: up to 8 banks, up to 25 cells per bank
- Cell boards mounted on the cells: one cell board per cell (or block of cells in parallel)
- The cell board mounted on the most positive cell in a bank is a positive end cell board
- The cell board mounted on the most negative cell in a bank is a negative end cell board
- All other cell boards are mid-bank cell boards
- Communication cables between the BMS master and the end cell boards
- Connection to AC line power
- Connections to the charger, to control it, and measure its DC output current to the battery
- Connections to the motor controller, and its throttle, to limit it or disable it, and to measure the battery current to it (and from it)
- Connections to any dashboard display
The BMS must be powered whenever the battery is in use (being charged or discharged).
It is best if the BMS is not powered when the battery is not in use, to avoid needlessly draining it.
During set-up, the BMS master is connected to a Windows computer to configure and monitor the BMS.
|
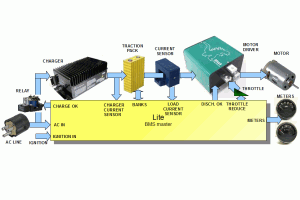
System block diagram (click to enlarge)
|
|
The BMS master interfaces to the cells, divided into banks.
It can handle up to 8 banks of cells.
The BMS master communicates with the banks through up to 4 shielded RJ45 cables; each cable handles 2 banks (called "green" and "yellow").
At the far end of each cable, a breakout adapter goes from the single RJ45 cable, to 4 individual, small cables.
Each small cable is a shielded pair, terminated with a 2-pin connector.
Two of those 4 small cables are used for the "green" bank (one to the most positive cell of the bank, one to the most negative one) and the other 2 cables are used with the "yellow" bank.
The BMS sends a serial digital stream (with a proprietary format) through the RJ45 cable, through the breakout and through a small cable, to a 2-pin connector on the positive end cell board.
|
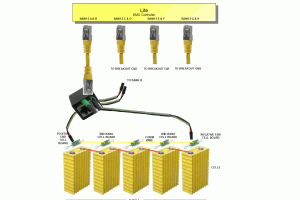
Banks block diagram (click to enlarge)
|
|
The positive end cell board (mounted on the most positive cell of the bank), provides electrical isolation between the incoming cable (which is referenced to ground) and its own electronics (which are referenced to the high voltage of the battery).
The cell board detects and executes any commands in the serial stream, adds data to the serial data stream, and passes it to the next, more negative cell board.
The communication between cell boards is through a single wire link.
The next cell board (a mid-bank board) receives data form the positive end cell board through the single wire link.
Just like the positive end board, it executes commands, adds data to the stream, and passes it to the next cell board.
The following cell boards operate the same way, down to the last cell board in the bank, which is a negative end cell board (mounted on the most negative cell of the bank).
The negative end cell board performs the same functions as the other cells;
but, instead of passing the serial stream to another cell board, it provides electrical isolation, and it passes it to its 2-pin connector.
A small cable, connected to the 2-pin connector on the negative cell board, carries the return serial stream back to the breakout, through the RJ45 cable, and back to the BMS master.
Other than the isolation at the positive and negative end cell boards, all the cell boards are identical.
There is no need to configure each cell board to give it a unique ID (to tell it where it is placed along the bank).
The BMS master tells the cell boards to measure their cells' voltage and temperature, and to turn their balancing loads on or off.
Each cell boards adds its measurement results to the data stream and passes it to the next cell board, and then back to the BMS master.
|
|
Whenever the electric vehicle is plugged into a power outlet, the line AC voltage powers the BMS master and the charger.
Line power from the AC plug powers the BMS master through its "AC Power" connector.
Inside the BMS master, a 12 V power supply powers the BMS.
That voltage appears on all the "12 V" terminals on the control connector (they are powered whenever the EV is plugged in the wall or when the ignition switch is on).
This supply provides enough power for the BMS master, plus a bit of extra current for external loads, such as small relays and indicator light bulbs.
|
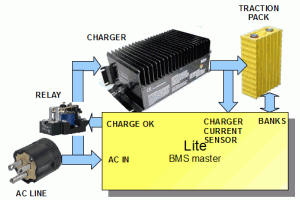
Charging block diagram (click to enlarge)
|
|
NOTE: the EV MUST must be wired so that the BMS is able to shut off the charger
In order to protect and balance the battery, the BMS needs to turn on or off the charger, through its "Charge OK" output.
If any cell voltage is above the V-cell-max setting, or any temperature is outside the charging temperature range, the BMS turns off the charger.
As soon as all cell voltages are back down to below the V-cell-high setting, and all the temperatures are within the charging temperature range, the BMS turns the charger back on.
When BMS wants the charger to be on, it turns the "Charge OK" outputs (one to ground, and one to 12 V); it also turns on the "Charge OK" LED.
Otherwise, it opens the two "Charge OK" outputs.
You may let the BMS master control the charger through the "Charge OK" outputs in one of 2 ways:
- With a power relay between the AC power input and the charger
- With a small relay that shorts out two control pins of the charger
Using a power relay works with any charger; only some chargers have control pins that you can use to turn it on or off.
In both cases, the relay coil is connected to the "Charge OK" outputs.
|
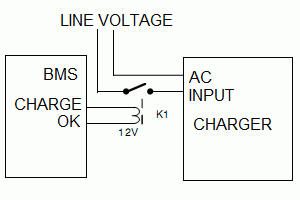
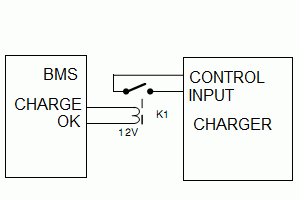
Charger switch: AC relay (top); control relay (bottom)
|
|
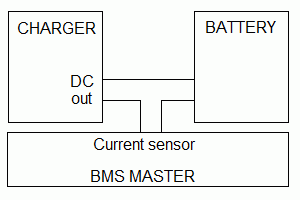
The charger output current is routed through the "Charger Current Sensor" terminals before reaching the pack.
Knowing the charging current allows the BMS master to:
- Report the current through the GUI application, and through the Ammeter output, which normally feeds a meter with a 0 to 5 V movement, and a dial with any scale of your choosing.
- Integrate the current to calculate the SOC (State Of Charge) of the pack; as the pack is charged, the SOC increases towards 100 %
|
Charger current sensing
|
|
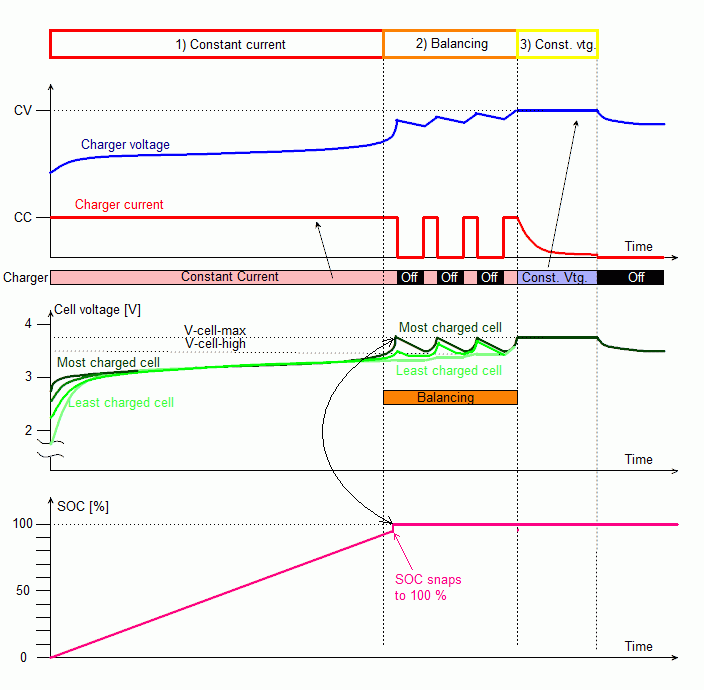
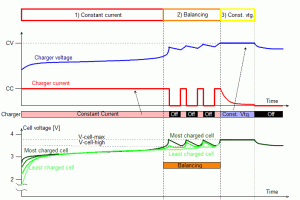
Charging with a BMS and a CCCV charger occurs in 3 stages (Watch video.):
- Constant current
- Balance
- Constant voltage
The Constant Voltage setting of the charger must be set to:
CV = number of cells in series x max cell voltage.
|
Three charging stages (click to enlarge)
|
|
Stage 1: constant current charging
During this stage, the BMS keeps the AC switch turned on, to power the Charger.
The charger operates in its CC (constant Current) mode, charging the pack at full current.
The BMS decreases its evaluation of the SOC value.
The first time the pack is charged, the BMS has no idea what the pack's initial SOC is: the SOC is uncalibrated.
It will remain uncalibrated until the pack is fully charged for the first time.
When powered up the first time, the BMS will assume an SOC of 50%.
If the initial actual SOC had been less than 50%, at some point the calculated SOC will reach 100 %, even though the pack is still not full.
On the other side, if the initial actual SOC had been more than 50%, the calculated SOC will be still be below 100 % by the time the pack becomes full.
Once the voltage of the most charged cell reaches V-cell-max:
- The BMS enters the 2nd stage: balancing.
- The BMS master calibrates the SOC by forcing it to 100 %.
Stage 2: balancing
During this stage, the BMS balances the pack.
The point of balancing is to maximize the pack capacity, by ensuring that the cell with least capacity is the limiting factor to charging and to discharging.
A pack is balanced if all of its cells are at exactly the same State Of Charge - at some point.
In an EV, that point must be at the top: fully charged (watch video.):.
The BMS balances the pack by removing charge from the most charged cells, to bring them down to the level of the rest of the cells.
It uses the "final voltage" algorithm: it uses a cell's voltage near 100 % SOC to decide whether to remove some of its charge.
Each cell board has a resistor load that can be placed across its cell to bleed off part of its charge, for the purpose of balancing the pack.
In this stage, the BMS top balances the pack by:
- Turning the charger on and off, to keep the voltage of the most charged cell between V-cell-high and V-cell-max.
The charger operates in its CC (constant Current) mode, at full current.
- Turning on the loads across the cells whose voltage is the highest to remove some charge, to make room for more charge when the charger comes back on to charge the rest of the cells.
That way, when the charger is turned back on, it can add a bit more charge to all the cells, including the rest of the cells that are not quite as charged.
This results in the charger switching on and off every few minutes.
The on-off duty cycle is such that the average charge current is equal to the balance current.
For example, with a 10 A charging current, and a 200 mA balance current, the charger may be on for 12 seconds, and off for 10 minutes.
After each cycle of removing charge from the most charged cells (slowly, at about 200 mA) and adding charge to all the cells (fast, at on the order of 10 A), the cells' SOC levels are a bit closer to each other.
After a number of cycles, all the cells are at the same SOC, all close to 100 %.
The first time, if the pack is built properly, this process can take a few hours; but, if the pack was built with cells at significantly different SOC, the process can take as long as a few weeks.
Therefore, we strongly recommend that you build your pack using cells that have a common history, or that you balance them with respect to each other before using them.
After a pack is balanced the first time, the BMS can keep it in balance in just a few minutes after each charge.
Tip: to avoid having to wait a long time while the BMS does gross balancing the first time, balance the cells to each other before building the pack, by connecting them all in parallel for a few days.
Once all the cells are at the same SOC (their OCV - open circuit voltages - are all the same), the BMS enters the 3rd stage: constant voltage charging.
Stage 3: constant voltage charging
In this stage, the charger operates in the CV (Constant Voltage) mode, maintaining its output at the voltage that it was set for: the voltage of a full pack.
The BMS keeps the charger continuously on, but the charge current decreases exponentially to 0 as the pack voltage gets closer and closer to completely full.
This reduction in current is not due to the BMS or to the charger: neither one is purposely decreasing the current.
Instead, this effect is the result of the physics of the sum of the cells' OCV coming closer and closer to the charger's Constant Voltage:
as that voltage difference decreases, the voltage across the cells' internal resistance decreases, resulting in less and less charging current.
Once the OCV of each and every cell becomes exactly equal to V-cell-max, the charger current is down to 0 (because the sum of the cells' OCVs is the same as the charger's CV voltage, so there is no longer a voltage difference to cause any current).
At that point:
- The BMS master sees that a cell reached V-cell-max (actually, all the cells did) and it turns off the charger, for the last time.
|
|
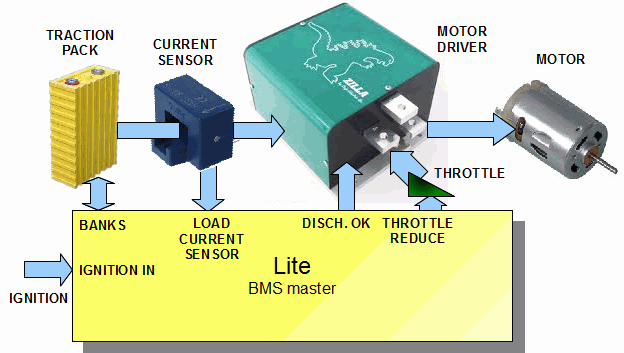
When the EV is on, the 12 V supply from the Ignition line powers the BMS master through its "IGN" input.
That voltage appears on all the "12 V" terminals on the control connector (they are powered whenever the EV is plugged in the wall or when the ignition switch is on).
|
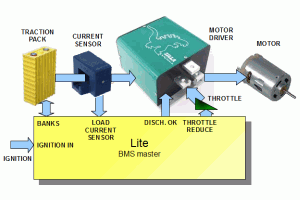
Driving block diagram (click to enlarge)
|
|
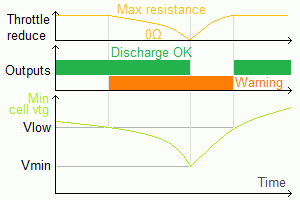
Whenever any cell voltage is below V-cell-low, the BMS warns the user that the pack is nearly empty.
It can do so in 2 ways, each of which may be implemented in an EV:
- Turning on the "Warning" outputs, which can light a "Reserve" indicator on the dashboard, or put the motor driver is a low power ("valet" or "limp home") mode
- Gradually decreasing the resistance in the "Throttle Reduce" terminals proportionally to the drop in cell voltage; that can be used to reduce the output from the throttle to the motor driver, to reduce its effective range
The "Reserve" indicator solution is least intrusive, but it relies on the driver reacting to the warning, which may not be wise.
The onset of the "Valet mode" can be disconcerting to the driver, and may be dangerous if full power is needed at the time.
The gradual reduction of throttle range is not sudden, which is nice, but may not be noticed when driving slowly.
If, after a period of rest, all the cell voltages relax back up to above V-cell-low, the BMS will end the warning by opening the "Warning" outputs and bringing the Throttle Reduce output back to its maximum resistance.
|
Throttle reduction, Warning and Discharge OK outputs, as a function of minimum cell voltage
|
|
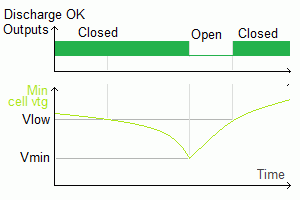
The EV MUST must be wired so that the BMS is able to shut off the motor driver.
Whenever any cell voltage reaches V-cell-min, or any temperature is outside the range for discharging,
the BMS tells the motor driver to shut off.
It does so by opening the "Discharge OK" outputs.
The EV can use those outputs in one of 3 ways:
- Power the 12 V supply to the motor driver
- Control the "Enable" input of the motor driver
- Power the main contactor, to switch off the high voltage to the motor driver
The BMS re-enables the motor driver once all cell voltages return to above V-cell-low, and all the temperatures are within the discharge range.
As the BMS turns on and off the "Discharge OK" outputs, it also turns on and off the "Discharge OK" LED.
|
Discharge OK outputs, as a function of minimum cell voltage
|
|
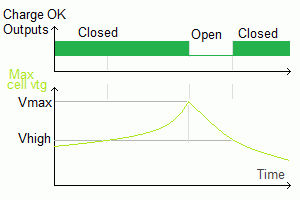
The EV MUST must be wired so that the BMS is able to disable regen from the motor driver.
If the motor driver is capable of regenerative braking, it will extract energy from the car's motion and generate current to be sent back to the pack.
If the pack is full (a cell voltage is above V-cell-max), or a temperature is outside the range for charging,
the pack cannot accept any more current.
If so, the BMS will prevent regen, by opening the "Charge OK" outputs.
The EV can use those outputs in one of 2 ways:
- Control the regen enable input of the motor driver
- Disable the output of a regen pot on the brake pedal
When all the cell voltages are below V-cell-high, and all the temperatures return within the range for charging, the BMS will re-enable regen by closing the "Charge OK" outputs.
|
Regen
|
|
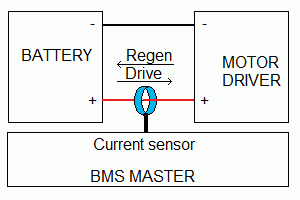
The load current from the pack is routed through the cable-mounted Load Current Sensor before reaching the motor driver.
That current flows in one discharging when driving (positive current), and in the charging direction when in regen (negative current).
Knowing the load current allows the BMS master to:
- Report the current through the GUI application, and through the Ammeter output, which normally feeds a meter with a 0 to 5 V movement, and a dial with any scale of your choosing.
- Calculate the SOC (State Of Charge) of the pack
|
Load current sensing
|
|
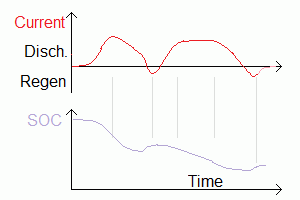
The BMS master integrates the load current to get the pack SOC.
When driving (and discharging the pack), the SOC will go down.
When braking (such as going down a tall mountain), regen will recharge the pack noticeably, and the SOC will go up.
Ideally, the SOC will reach 0 % just as the lowest charged cell becomes empty.
However, if the BMS is not configured properly, it may introduce errors in the SOC calculation; for example:
- If the BMS setting for pack capacity doesn't match the actual pack capacity, the rate of decrease in the SOC will be wrong
- If the offset in the current sensor is not calibrated, the calculated SOC will drift with respect to the actual SOC
- If the V-cell-min setting is too high, the BMS will shut off the pack before it is completely empty
Even if the BMS is configured properly to calculate the correct SOC, if the EV is used aggressively, the cell voltages may sag considerably, and the BMS may shut off the pack before the SOC reaches 0% SOC.
You cannot rely just on the reported SOC to determine how much farther you can drive:
in some cases the BMS may report a significant SOC level and yet shut down the pack because a cell voltage is too low;
in other case, the BMS may report that the SOC is 0 %, yet the pack may be able to generate more charge.
The only true indicator that the pack is nearing being empty is the voltage of the lowest charged cell.
The BMS does not report that voltage directly to the driver.
Instead, the BMS makes the user aware of that condition through throttle reduction, described above
|
SOC calculation example
|
|
|