|
|
Description
Operating principles of the Lithiumate Lite
|
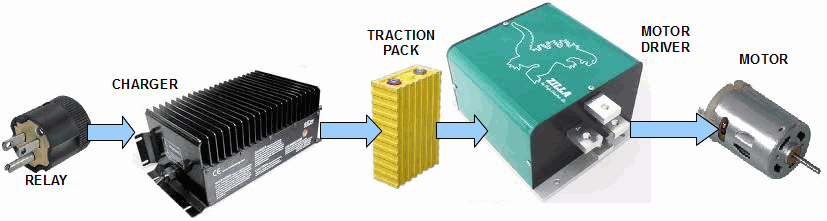
The typical Li-Ion EV traction system consists of:
- A traction pack composed of Li-Ion cells
- A charger
- A motor controller, with a throttle
- A motor
- A BMS to protect and manage the pack, by controlling the charger and the motor controller
The BMS is an integral part of the EV traction pack, and a significant component in the complete EV system.
|
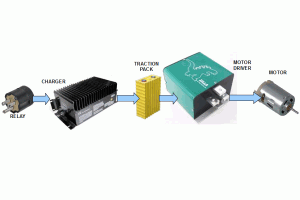

EV block diagram (click to enlarge)
|
|
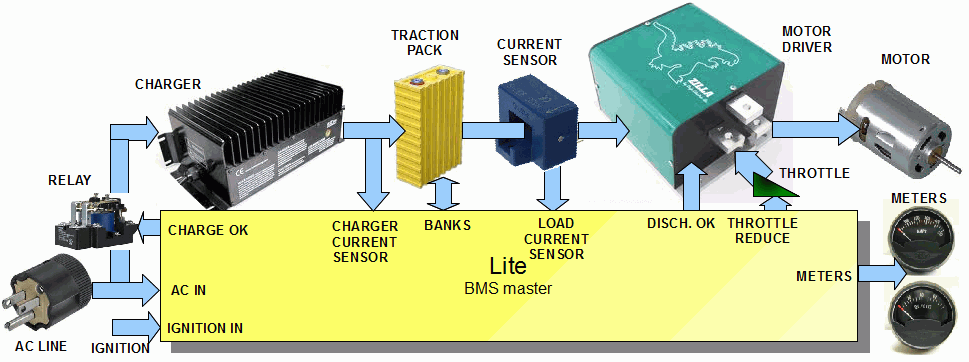
The Lithiumate BMS using a Lite BMS master consists of:
- A BMS master
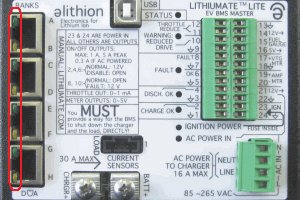
- The traction pack, divided into banks of cells: up to 8 banks, up to 25 cells per bank
- Cell boards mounted on the cells: one cell board per cell (or block of cells in parallel)
- The cell board mounted on the most positive cell in a bank is a positive end cell board
- The cell board mounted on the most negative cell in a bank is a negative end cell board
- All other cell boards are mid-bank cell boards
- Communication cables between the BMS master and the end cell boards
- Connection to AC line power
- Connections to the charger, to control it, and measure its DC output current to the battery
- Connections to the motor controller, and its throttle, to limit it or disable it, and to measure the battery current to it (and from it)
- Connections to any dashboard display
During set-up, the BMS master is connected to a Windows computer to configure and monitor the BMS.
|
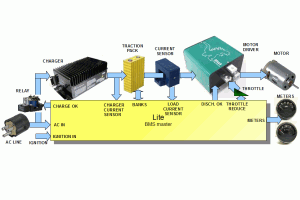
System block diagram (click to enlarge)
|
|
|
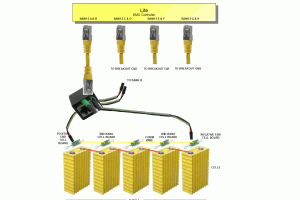
Banks block diagram (click to enlarge)
|
|
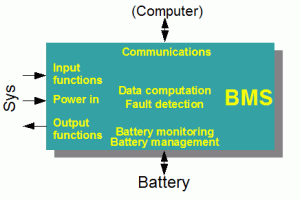
The BMS performs the following functions:
- Power (in and out)
- Monitoring
- Computation
- Management
- Fault detection
- Outputs
- Communications
|
|
| Power
|
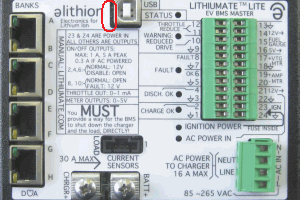
The BMS master may be powered by either of two power sources (line power AC and Ignition 12 V) and puts out voltages for your use
|
| Monitoring
|
The BMS measures the voltage and temperature of each cell, and the battery current
|
| Balancing
|
The BMS master balances the battery SOC by removing charge from the most charged cells
|
| Computation
|
The BMS master computes:
|
| Outputs
|
The BMS master drives a number outputs to control the external system and report conditions, and LEDs to report the status
|
| USB port
|
The BMS master can communicate with a a GUI application running on a computer.
|
|
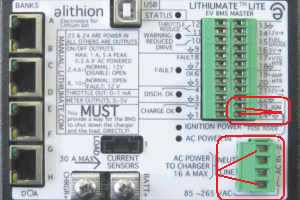
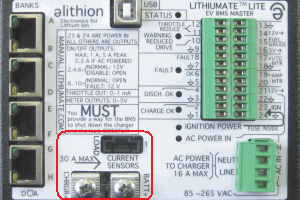
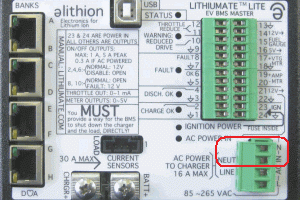
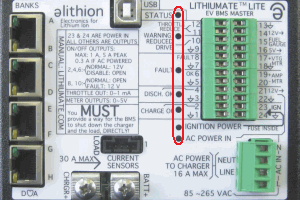
Power in:
The BMS master may be powered by two sources, and is able to detect which one has power.
- AC line (110 to 220 Vac), through the large green terminal block
- Ignition (12 V), through pin 23 of the green control terminal block, and ground through pin 24
For input limits, see the specifications.
|
|
|
Power out:
Whenever the BMS master is powered, it outputs 2 voltages for external use:
- 12 V, on pin 14 of the green control terminal block
- 5 V, on pin 16 of the green control terminal block
Note that these supplies can only provide limited current, especially if powered by the AC line.
For output limits, see the specifications.
Note also that the AC output for the charger is not implemented: the 2 middle screws of the 4-screw terminal block are not wired.
|
|
The BMS monitors:
- Cell and battery voltages
- Cell board temperatures
- Battery current
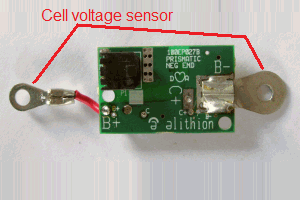
- The BMS measures the voltage of each cell (or set of cells in parallel).
- It adds all the cell voltages to get the pack voltage
- It determines the voltage of the most charged and of the most discharged cell, and calculates the average cell voltage
- It estimates the OCV (Open Circuit Voltage) of each cell, that is the voltage that the cell would have if it were not under load
- It calculates a time-average of the minimum cell voltage and of the maximum cell voltage (the BMS bases its behavior on these values, to avoid premature decision based on instantaneous values)
|
|
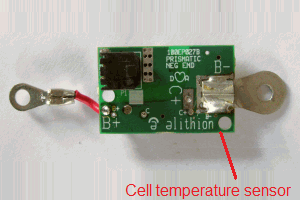
- The BMS measures the temperature of each cell board (not the temperature of the cells themselves), which is an indirect measurement of the cell it is connected to
- It determines the temperature of the hottest and of the coldest cell boards, and calculates the average temperature
- As the temperature seen is higher during balancing (due to the heat from the balancing resistor), it regularly pauses balancing to let the cell board cool down to the cell temperature, so that it can take a measurement and save it.
- In the GUI application, you can select to see the actual (real time) cell board temperature, or the cell temperature, which, during balancing, will be the previously stored value
|
|
|
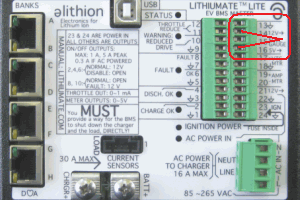
The BMS master measures the battery current in 2 ways:
- Charger current, through the internal current sensor (30 A max, unidirectional)
- Load current, through an external, cable mounted sensor (900 A max, bidirectional - drive and regen)
Which sensor is used depends on how the BMS master is powered:
- If powered by the AC, the BMS master uses the internal current sensor
- If powered by the ignition, the BMS master uses the external cable mounted current sensor
|
|
|
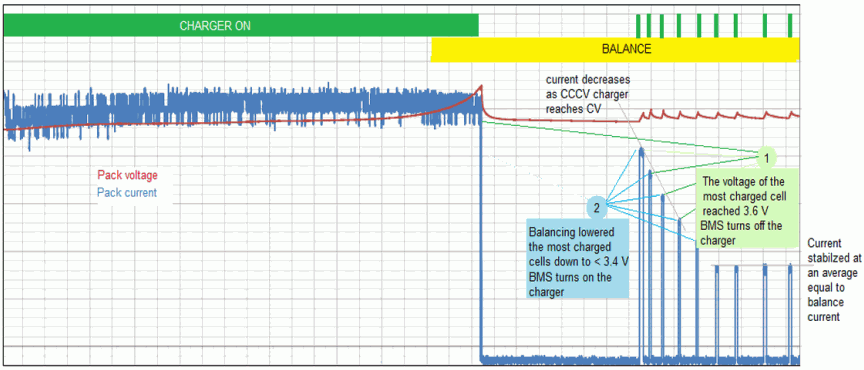
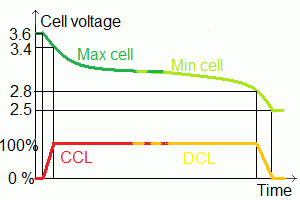
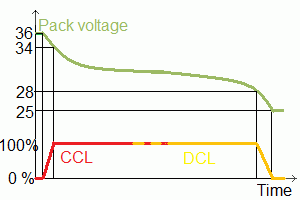
A balanced battery will hold the maximum possible amount of energy.
A balanced battery is one in which all the cells are at the same DOD at some point.
The BMS master balances the battery SOC by removing charge from the most charged cells.
It uses dissipative balancing to waste the extra energy in the most charged cells as heat.
Having done so, then the charger is able to put a bit more charge in all the cells.
This process is repeated until all the cells are at the same DOD.
At that point no more energy is dissipated for balancing.
Because all the cells have different capacity, it is not possible for the cells to be all equally charged both when full and when empty.
Therefore, they can only be balanced at a particular SOC.
This BMS does "top balancing": it balances the SOC at 100 % SOC (0 DOD, full battery), because top balancing is ideal in EV applications.
The state of the charger (the "Charge OK" output) and the balancing process are independent of each other:
whether the charger is on or off has nothing to do with whether cells are being balanced or not.
Yet, the 2 processes work together to achieve a balanced pack.
Because the BMS controls the charger, it's possible for the balancing current to be much less than the charging current.
(In systems where a bulk charger remains on continuously, high power balancing circuits are required, as they have to have to bypass just as much current as the charger is putting in.)
This is because the balancing current can stay on continuously, while the charger is turned on and off.
By changing the On/off duty cycle of the charger, the BMS can reduce the average charging current to the same level as the balancing current.
This plot (click to enlarge) shows an actual charging cycle with Lithiumate BMS, including the balancing process.
- Charger: Fail if powered by the AC and the "Charge OK" output is off, yet there is still charge current
- Load: Fail if powered by the ignition and the "Discharge OK" output is off, yet there is still load dicharge current
- Regen: Fail if powered by the ignition and the "Charge OK" output is off, yet there is still charge current
- Charger current sensor: Fail if the charger current sensor detects that there is discharge current
- Load current sensor: Fail if the load current sensor detects that there is charge current when the battery should be discharging
|
|
The BMS uses the above measurements to calculate certain parameters:
- DOD (and SOC)
- Capacity
- Cell resistance
|
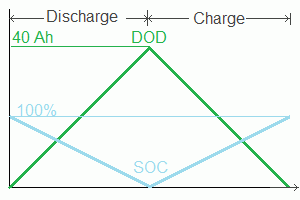
Depth Of Discharge (DOD) is a measure of the charge that is extracted from a battery.
Its value starts at 0 when the battery is full, and increases as the battery is depleted.
Its units are Ah.
There is no direct way of measuring the Depth Of Discharge of a battery.
No indirect method is of measuring it is accurate, as explained in this white paper on Li-Ion SOC estimation
This BMS master uses a combination of two methods:
- It normally uses "Coulomb Counting", clamped so that it won't go negative
- It calibrates the DOD to 0 when poweewer by the AC, and the most charged cell is fully charged
In simple terms, State Of Charge (SOC) is the reverse of DOD: it starts at 0 when the battery is empty, and increases as the battery is charged.
Its units are in %.
It is a more standard measure of state of the battery's charge than DOD, yet DOD is a more useful measurement, because SOC is limited to 0 % and 100 %.
Knowing the actual battery capacity, the BMS calculates SOC from the DOD.
For more information, please see a white paper on Li-Ion SOC estimation.
|
|
|
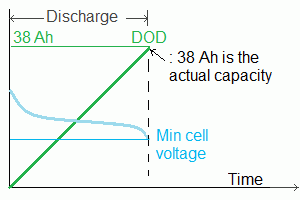
As we just saw, in order to calculate SOC from the DOD, the BMS needs to know the actual capacity.
Initially, the BMS assumes that the actual capacity is the nominal capacity value you entered when configuring the settings.
Later, the BMS may be able to measure the actual capacity.
Actual battery capacity is the DOD at full discharge (when a cell is too low to be discharged any further).
Battery capacity can only be measured in applications that fully charge and discharge the battery (such as PHEVs).
This BMS is specifically for BEVs (Battery Electric Vehicles), and, in BEVs, it is never desirable to completely run out of juice, so measuring the capacity may not be possible.
Because of DOD drift (due to current sensor offset), this BMS calculates actual capacity only during a cycle that starts from fully charged and end with full discharge.
|
|
|
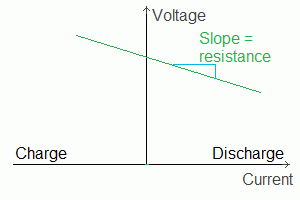
The dynamic resistance of the battery is a measure of its internal DC resistance under load (as opposed to AC impedance at 1 kHz).
It is the slope of a straight line that goes between two operating points in the battery's I-V curve.
It is affected by DOD, temperature and age of the battery.
In order to measure resistance, the BMS must be able to measure the battery current, and the battery current must vary.
If the battery current is 0 (or the current sensor is not installed), or the battery current is constant, the BMS cannot measure the resistance.
The BMS calculates the resistance of each set of cells in parallel, by taking multiple snapshots of their voltage at a given current.
This works well for applications such as BEVs, in which the current varies considerably during use.
The BMS determines the resistance of the most charged and of the most discharged sets of cells, and calculates the average resistance.
It adds all the resistances in a series string (divided by the number of batteries in parallel, if that's the case), to get the pack resistance.
|
|
|
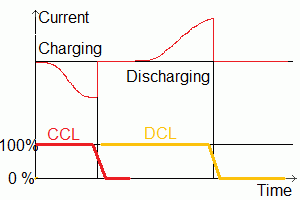
The BMS master calculates two current limits:
- CCL (Charge Current Limit)
- DCL (Discharge Current Limit)
The CCL is used only internally; the DCL is also used to control the Throttle Reduction, to reduce torque when the battery is nearly empty.
|
|
|
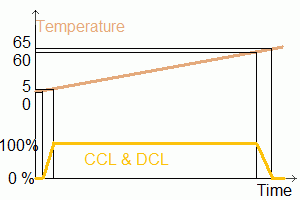
These limits are normally at 100 % (unlimited), but can be reduced based on:
- The voltage of the most charged and most discharged cells
- The temperature of the coldest and hottest cells
- Separate temperature thresholds are used for charging and for discharging
- The current
- Separate current thresholds are used for continuous and for peak
- Whether there is a fault (in which case they are reduced to 0 %)
- The pack voltage
The purpose of the first 4 is to protect the battery.
Therefore, normally, the CCL and DCL settings are based solely on the cell specifications, not on the system capability.
That is, if a 100 Ah cell can handle a 0.5 C charge continuous, and a 3 C peak charge, then the BMS settings should be 50 A continuous and 300 A peak.
The fact that the charger can only put out 5 A has no bearing on these settings.
And, if regen can generate 500 A, that doesn't mean that you set the peak CCL to 500 A! No! The peak CCL is based on the cell capability (300 A peak in this example), not on the system capability (500 A peak in this example).
The BMS is protecting the cells, so don't set the limits beyond the cell's specifications.
|
|
|
The purpose of the last one (pack voltage) is to protect the system (not the battery) and is optional.
By default the pack voltage limits are set at extreme values, so that it never has an effect.
You should change the pack voltage limit from their default only if there's a component in the system that cannot handle too high or too low a pack voltage.
|
|
|
The BMS master performs a set of BMS tests, to detect if the BMS not wired properly
- Charger: Fail if powered by the AC and the "Charge OK" output is off, yet there is still charge current
- Load: Fail if powered by the ignition and the "Discharge OK" output is off, yet there is still load dicharge current
- Regen: Fail if powered by the ignition and the "Charge OK" output is off, yet there is still charge current
- Charger current sensor: Fail if the charger current sensor detects that there is discharge current
- Load current sensor: Fail if the load current sensor detects that there is charge current when the battery should be discharging
|
|
|
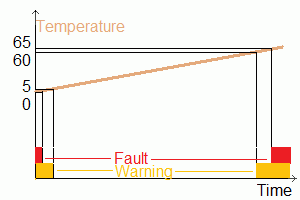
The BMS master issues warnings and faults based on measured or calculated data, and tests performed, as described above.
- Low or high temperature warning, overtemperature fault
- Low cell voltage warning while discharging
- High current warning, overcurrent fault
- Failed BSM tests fault
- Plug & drive fault
- Bank communications warning and fault
- No cells fault
|
|
|
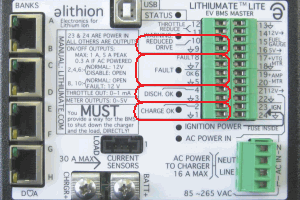
The BMS master drives 5 logic outputs:
- Charge OK: active if the battery can accept charge
- Discharge OK: active if the battery can deliver charge
- Warning: active if the battery is being discharged near its limits
- Fault: active is the BMS has detected a fault
- OK: active is the BMS has not detected a fault
|
|
|
Additionally, in hardware rev E, the BMS master drives an additional logic output:
- Charger control: NO, isolated contacts, shorted if the battery can accept charge
|
|
|
The BMS master drives 4 analog outputs:
- Throttle reduce: a variable resistance that can shut off the throttle signal to the motor driver
- Fuel Gauge / SOC: a variable PWM that can drive an SOC meter or a standard fuel gauge
- Voltmeter: a variable voltage that can drive a voltmeter to show pack voltage
- Ammeter: a variable voltage that can drive a voltmeter to show pack current
|
|
|
The BMS master has 17 LEDs to indicate its state:
Seven LEDs are in a row, by the green control terminal blocks:
| Name
| Color
| Function
|
| Status
| Green
| Normally blinking fast, lightly. In case of fault, it flashes the fault code
|
| Warning
| Amber
| Lit when the "Warning" output is on
|
| Fault
| Amber
| Lit when the "Fault" output is on (and the "OK" output is off)
|
| Discharge OK
| Green
| Lit when the "Discharge OK" output is on
|
| Charge OK
| Green
| Lit when the "Charge OK" output is on
|
| Ignition power
| Green
| Lit when the BMS master is powered by the ingition
|
| AC power
| Green
| Lit when the BMS master is powered by the AC line
|
|
|
|
Two LEDs are mounted on each RJ45 connector:
| Name
| Color
| Function
|
| Green bank
| Green
| Indicates the status of the "green" bank connected to that connector
|
| Yellow bank
| Yellow
| Indicates the status of the "yellow" bank connected to that connector
|
|
|
|
Two LEDs are nestled against the USB connector:
| Name
| Color
| Function
|
| RX
| Green
| The BMS master received data from the PC
|
| TX
| Amber
| The BMS master sent data to the PC
|
|
|
|
The BMS master can communicate through a USB port with a computer, typically a Windows computer running the Lithiumate Lite GUI application, and typically only during set-up and testing.
Due to limitations in the USB implementations, this link is not intended for permanet use in a vehicle.
|
|
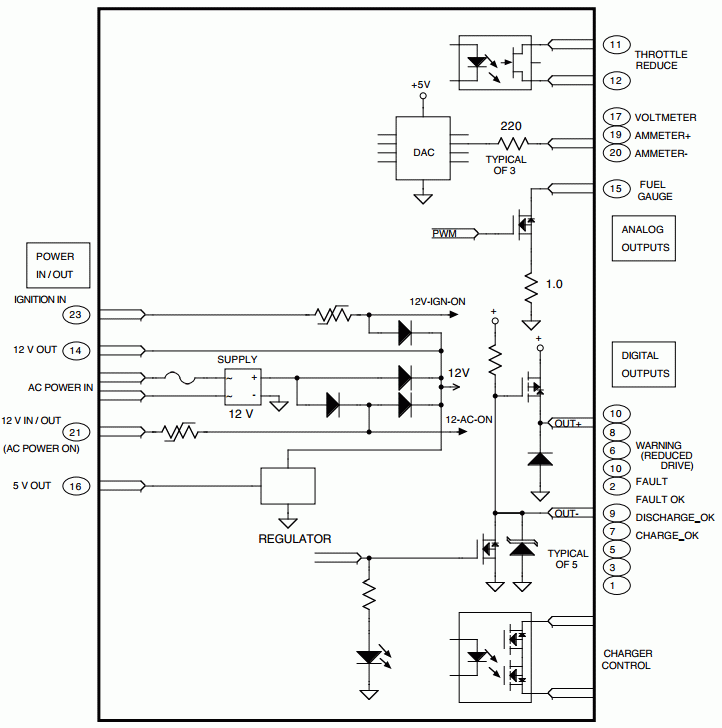
This simplified schematic shows the circuit of all the inputs and outputs.
|
|